Blank Canvas
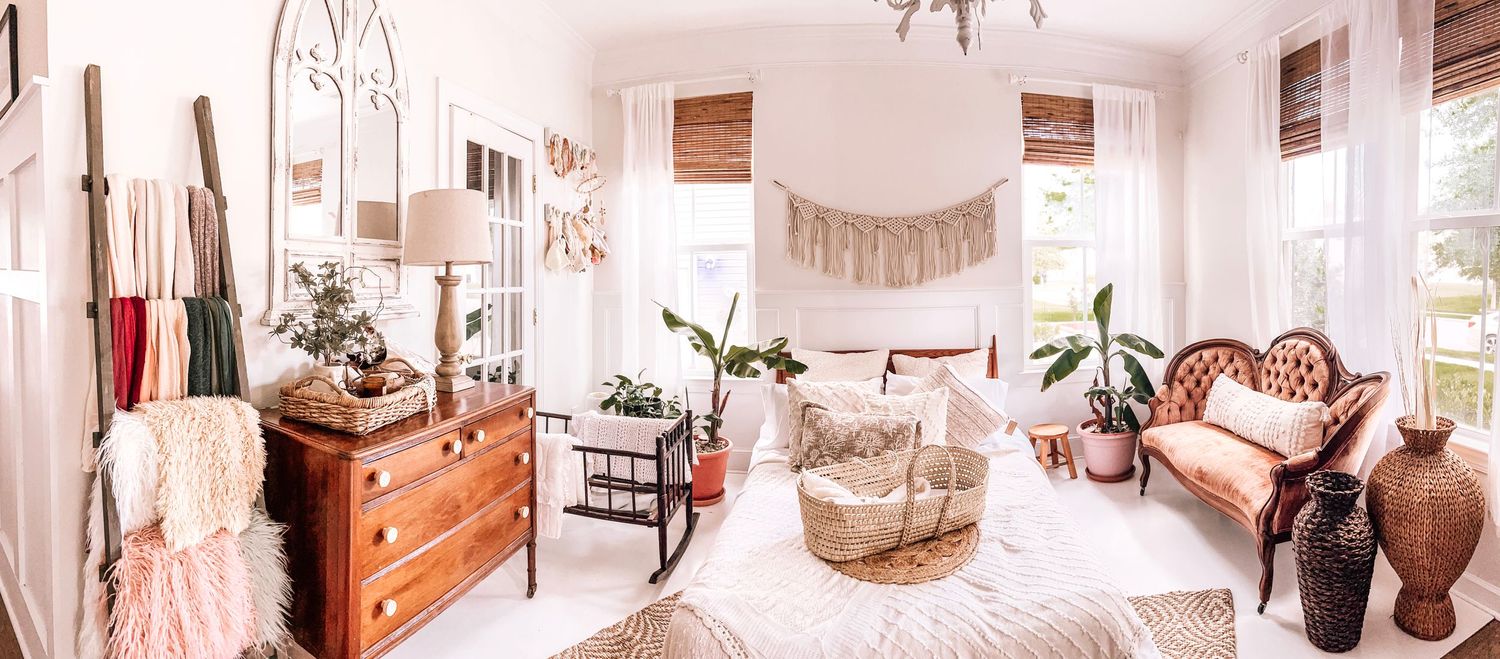
My Photography Studio is In-Home (In my home). I chose the entry room for my studio because it is the brightest room in our home and also convenient for client's to walk right into for sessions. The only downfall is the size of the room. I tried so many different design ideas for the space only to realize, the cleanup process was a lot and once everything was put back, the room just felt empty and awkward. I knew in order for my space to look and feel professional; I would need to sit down and really draw out a design plan that would allow beautiful decor as well as functionality. When the opportunity became available after an accidental water leak in the Main water line (yes! a very stressful and chaotic day); $250 later, I had a blank canvas to start with.
Paint
Paint choice in a small room is crucial! You can make the room look even smaller with dark colors. Being that this room is going to be solely for studio space; I decided white walls was the way to go.
*Tip- color casting is when the surrounding colors of the subject reflect those colors on your subjects' skin, clothes, etc. You can use this for your advantage or if non- intentional, it can create a huge issue in post processing.
I am mainly a natural light photographer and love using natural light when it is available; white studio walls would reflect that natural light coming in and bounce it off my subject to create a creamy and airy feel with minimal shadows.
If you are photographer who prefers a moodier type of editing, then darker paint, brick walls and other accent pieces would be your jam; go for it!
Keep Things Minimal
Simplicity is your best friend when working with a smaller space. Allow your space to be minimal with pops of your personality. I have a very simplistic style already; although this was my studio space, It was also still very much a part of my home. I wanted to create a space that didn't completely blend in with my home, but wouldn't be dramatically different either. I chose good size furniture pieces, full frame headboard, Settee, Blanket Ladder and a Dresser. These pieces helped fill the room and made it feel "homey".
Mirror
I added a mirror above the Dresser which happens to be on the opposite wall of my largest window. I cannot explain enough how this one mirror makes a difference. It reflects the light evenly throughout the room so much that I do not need studio lighting because the natural light is bright enough on it's own. I have seen the room without it and it is a lot darker. I strongly recommend adding in a mirror to your small space, right across from your biggest window if your design allows it.
Windows
Windows play a huge part in how big your space will feel. I've seen very large spaces feel cramped because the colors chosen for the design were very dark and bold. sometimes designers use bolder colors as fillers when the space is too open. It really does make a huge difference.
The windows in my studio are standard size windows (84in x 32in), and I have 4. While I would much rather floor to ceiling to bring in more light; that was simply not an option. To make my windows look taller and allow my client's eye to be drawn up when walking into my space; I hung my curtains a few inches higher than the top of the window.
Wall Space
With all of the furniture pieces I chose, There was just enough walking room in between the bed and dresser. But I still had props and client essentials that needed a home. With only 3 walls to work with (2 having windows); I decided to use wall storage.
"If you can't go out, go up!"
I had brought my daughter some wall hooks years ago to hang client headbands and tiebacks on; after some paint and distressing, it fit right in with the rest of the decor. Bigger props were tucked away under the dresser.
*Tip- To minimize cluttering your floor space, consider wall storage; without cluttering up your walls of course.
Multi-Functionality
Functionality was the hardest part in my design process. When creating the frame for the bed; I wanted something that would be durable enough to allow 2 adults to sit, something that wouldn't be too big and also not need to be moved if possible. I searched Pinterest and found a few ideas from other photographers. They had built a platform that acted as a floor drop on wheels or could easily be used as a bed (mattress on top).
It was brilliant!
This design would allow quick cleanup in between sets and less muscle work for me. Work Smarter not Harder!
Another furniture piece in my studio that has multi-functionality is my Dresser. It holds all of my layer pieces, majority of my blankets, hats and bonnets and a lot of my newborn smaller props.
I put use to my blanket ladder and hung all of my newborn swaddles and flokati's on each stair. It makes them easy to see and grab for sessions.
Storage is huge when working with a small space, any place you can store things; use that opportunity to clean up the clutter.
Textiles
Textiles are where you can have a bit more fun and express more of your style. Adding layers to you room will help bring more texture, warmth and color. I added a variety of blankets on my prop bed. I started with a very plush down as the base and gradually added some knitted throws and vintage fabric as well to tie into the design.
I incorporated layers in my pillows too; I started with two big pillows in the back, two standard size pillows, then a bunch of throw pillows in different neutral colors, textures and shapes.
For my windows, I decided not to layer up the curtains because I didn't want to darken the room at all. I went with white sheer curtains; these curtains come in handy because they help diffuse the sunlight as well as provide a bit of privacy.
You Got This!
Any space is useful! Big or small; the power to create is in the eye of the beholder. I could create in a card board box lol; in fact I have (I'll have to blog about that soon lol). But on a serious note, don't feel discouraged if the space you have isn't the largest. I hope this post is useful and helps someone who may be stalling on opening their studio space, based on the size. Im here to tell you that its ok to work with what you have, it may not be your end goal but its a start!
Did you recently redo your studio? What were some design elements you kept in mind when planning? I'd love to hear all about it.